Showing posts with label project. Show all posts

Friday, December 21, 2018

Kitchen Cart...

When you are a single person, you take on all sorts of responsibilities if you are a homeowner or apartment dweller.  When you marry, responsibilities tend to be divided among spouses; each one having certain duties, usually the wife taking care of the inside of the house and the husband taking care of every thing else...repairs, yard duties and Honey Do's.  We take a lot of things for granted that our spouse does and over the years those things just all seem to get lost/unnoticed in every day living.

Since Poppa has become immobile a couple of years ago, I have had to learn a lot of those things that I took for granted that he did.  It has been extremely difficult for him to relinquish what was considered his job and it was extremely difficult for me to take on those duties, but I must say, I am delighted to learn that I CAN do some things that I never thought possible.  I would have never learned/known this if life had not changed for us.

The first thing I put together was his wheelchair.  From there I have acquired my own tools, small and light weight enough for me to handle...a new lawn mower and POWER TOOLS!!

My most recent project and current creative outlet was putting together a new cart for our kitchen to replace a stainless steel cart that we had.  I love this new cart.  There is room on top for my Kitchenaid MONSTER MIXER and still have space to work.  An added drawer is nice and there is a shelf inside to contain some of my appliances and keep them out of sight but within easy reach.


Today Poppa helped me make banana pudding.  He is learning some things about house duties that can be done from a wheelchair, but I still have not found a way to spark an interest enough that he wants to learn to cook! [ but I haven't given up yet ...]

Our new cart is finished just in time to do some holiday baking.  Learn something new this next year.  Expand and grow.  Love and cherish each other, your family and friends.  Life can change in an instant.  ENJOY THE MOMENT!!

Creating is healing and coziness for the soul...
~Edna~

Saturday, May 27, 2017

Crepe Myrtle Project is finished!

In our ongoing mission to simplify, we added edging and mulch to the area around our Crepe Myrtles that was difficult to mow around and time consuming to weed wack.  We are loving the results.

Here are the before's:

I started out by putting pavers and pea gravel in our water faucet area.


Here is what it looked like before I started.


Then I started putting down edging.


Next came the mulch and top soil, two or three bags at a time that I hauled on our trusty workhorse lawnmower that comes in handy for so many things.


Poppa was able to help with the mulch spreading.

Here are the after's:
I transplanted some Elephant Ears to the bed by the electrical pole.  They are in semi shock but I think will survive nicely in their new location, along with Zinnia's seeds that have yet to come up.


We are pleased with this labor of love and delighted to mark this off of our list. Now, on to the East Side Project after a restful weekend holiday!

Wishing you a blessed and peaceful Memorial Day weekend.  Remember those who gave their lives that we may enjoy our freedom.

Dig in the dirt.  It's healing and good for the soul.
~E~

Friday, March 24, 2017

Green House and Raised Garden Project

Hello Friends and Welcome SPRING!

I am happy to report that reclaiming our green house is finally finished.  Poppa put new screen in the window screens and we put them on the windows, completing our Green House project, except for exterior painting which will be done when we repaint the exterior of the house.  It has taken many months but it was a labor of love and hopefully the flooding issue has been solved.  Time will tell.


...and I am tickled with our Raised Garden!

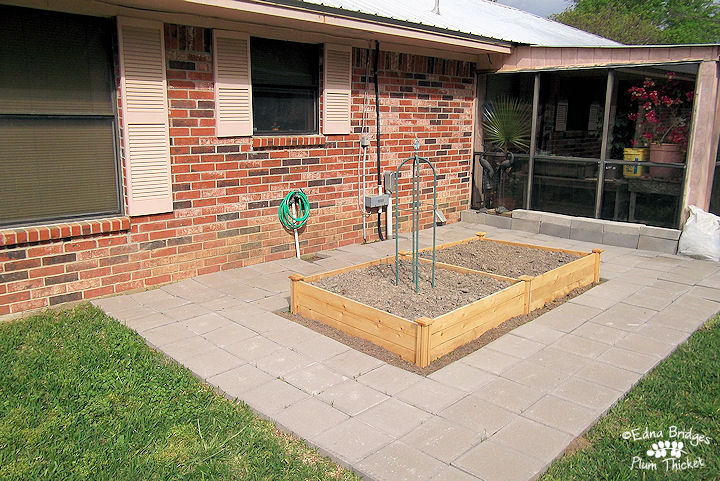
Here are the BEFORE pictures.  It was a problem to weed eat this area.  Our goal is to simplify.


Confucius said, "The man who moves a mountain begins by carrying away small stones." That is exactly what I did with this project.  Small baby steps and wee increments of time. All of the debris was removed, then I put down a weed barrier, put down concrete blocks and caps next to the green house to hopefully prevent flooding.  Then I started moving 12" x 12" concrete pavers (purchased and delivered from Lowes), a few at a time with the help of my trusty Hustler Zero Turn Lawnmower.  Starting at the back wall, once I got the pavers in place so I could tell where the garden was to be, I put together our sweet 4' x 8' raised garden kit from WalMart.  It only took about fifteen minutes to put it together. After it was in place, I called in help!  Our neighbor put 4 bags of mulch, 20 bags (40 #'s each) of top soil dirt and 6 bags of humus into the raised garden.  He screwed on the top caps for the raised garden and also put several pavers in place on the east side of the garden. He did work in a matter of minutes that would have taken me days to do.  Thank goodness for neighbors! A few days later I decided to put more pavers down so Poppa can get all around the garden in his Wheelie.

AFTER:


I am so pleased with how this project turned out!  A raised garden has been a dream of mine for a long while.  Now we are waiting on the weather to settle down.  Grandma always said there will be a *cold snap* right before Easter and Grandma was usually right. We have a late Easter this year. Seeds and plants have been ordered online.  How did we ever get along without the internet?  It's a sweet day when you can dig in the dirt!  Slow down, enjoy your life what ever it may bring.

Until next time...

Thursday, February 25, 2016

February Happenings...

February has been a whirlwind of activities here at the farm.  A visit from Sis and Nieces is always delightful; lots of love, laughing and conversation.  Family and friends coming and going and news of a wedding in mid summer add to the mix along with new adventures on the horizon for me.  I have found renewed energy due to some negative things that have removed themselves from my life. It's amazing how time takes care of some problems if you just leave them alone.

Since I decided to part with my kilns and supplies the end of last year, I am finally ready to tackle my mold storage building that was destroyed by a couple of large tree limbs falling on the roof a few years ago. I have not had the heart to deal with the damaged and broken ceramic and porcelain doll molds, but now it's time.  So, I put on my boots and my hard hat, cut away the tarps and went inside to survey the damage.  About two thirds can be salvaged and my friend that got my kilns will have lots of molds to play with. Getting them moved to a new location is next on the agenda. This is an old picture when the first limb fell.  The second one destroyed the roof and blew all the sides out.


We basically have not had any winter this year with only a few nights that reached below freezing. Trees and flowering bulbs are already coming to life.  We had sleet and snow last March so we will see what March has to offer this year. Hopefully sun shinny days so I can get this project finished.


Saturday, September 13, 2014

Buckwheat Hull Pillows

I'm still in pillow making mode!  Several years ago I made us some buckwheat hull pillows after being introduced to them on a Martha Stewart television show. Our little blind dog soon took them over because they were so comfortable. This week Poppa requested new buckwheat hull pillows so I got out my old serger and whipped us up a couple for our bed. They conform to your head and nicely support your neck. These are a tad bit smaller than regular size bed pillows. Now I need to make some custom size pillow cases, with maybe some French sewing or handmade crochet lace. One project seems to call for another. Don't we have fun?


Friday, May 16, 2014

Old Things...

I LOVE old things; chippy paint, time worn, rusted, frayed, vintage.  I also love old window frames and have wanted a cathedral window frame for a long, long time.  Being the frugal (aka cheap) person that I am, I would not spend the money for an old architectural find....so.....I made one myself using some of the techniques I used in my Sweet Inspirations Cage Doll class.  It is much easier to make old things look new.  Making new things look old is a wee bit more difficult.  I love the way it turned out.  I put a shelf on the bottom and have it hung in the space that was calling for this piece (more on that later).  Now it's time to create some sweet things for this shelf.  Can't find what you want?....Make your own!

Friday, March 28, 2014

Computer Workstation Redo

I have two computers in my studio/nest.  One I use to make my patterns, do graphics and my online work...

 
and one on the other side of the room that I use for making my online videos and home movies. I love doing home movies of all of our projects and renovations.
 
 
I painted both of the desks Country White and moved them both to one location. I like this arrangement much better and it is much more convenient.


Monday, March 24, 2014

Cedar Chest Redo

My Son and Daughter In Law gave me this cedar chest several years ago.  I added bun feet (fence finials from the hardware store) and painted the sides black.  Now that I am painting almost every thing Country White, this roomy cedar chest recently got a new look.  The handpainted graphic is my version of a vintage French architectural design I saw somewhere? on Pinterest.


Monday, March 10, 2014

1940 Ironing Board and Stained Glass

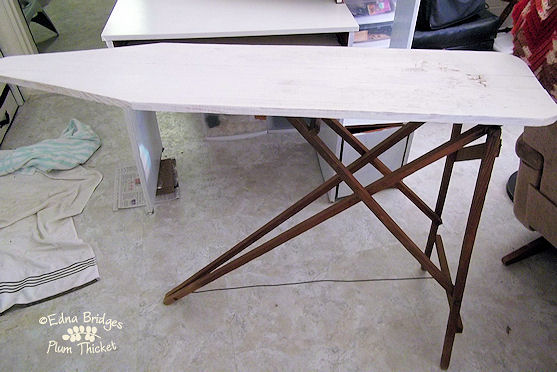
My Mother purchased this wooden ironing board in 1940 for $3.19.  She paid it out Twenty-five Cents a week until it was paid for.  I am going to put it to good use...
Before

 
After with a rustic coat of Country White Semi
Gloss Latex on the top only

 
After After to be used as an end table
beside my daybed

 
After After
The vintage galvanized food carrier sitting in the floor
contains my beading and ribbon embroidery supplies

 
Poppa made this beautiful Stained Glass Bird
in a class in the late 1970's.  I do wish I could
get him interested in doing stained glass work again :)


Friday, March 7, 2014

End Table Redo

I have had this maple end table for probably 50 years so it was time for a make over since I am redoing my studio/nest.  I use this table for my printer and I also prop my feet up on it to get comfy while working at my computer.


I am delighted with the way it turned out!  A good sanding with 0000 steel wool, a couple of coats of Country White Semi Gloss Latex paint from WalMart and a sweet graphic from The Graphics Fairy.  I transferred the graphic using chalk pastel and then hand painted it with a black Sharpie pen.  After a couple of coats of Poly Sealer, I am ready to put this sweetness to good use for another 50 years!


Monday, February 10, 2014

One project down...several more to go!


This was really a fun project, labor of love.  Now I can't wait to start getting my sewing supplies organized!

Monday, February 3, 2014

Thursday, January 30, 2014

Project: Bible Stool Makeover

I have a tiny stool that sits by my comfy chair and holds my Bible and a small Jesus Calling book by Sarah Young.  The stool got a makeover!  The bird graphic is from The Graphics Fairy.  I did a heat transfer (thanks to my new Clover Mini Iron), enhanced it with a permanent marker and aged with Ralph Lauren Glaze.


I write in my Bible, mark in my Bible; highlight things that speak to my heart and dog ear pages.  Is your Bible being used, or is it gathering dust?